 A
Period Chair
A
Period Chair
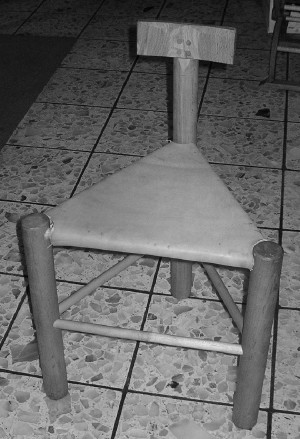
Figure 1 is taken from a Renaissance painting; figure 2 shows a chair based on the same design. It is the only period design I have so far discovered which combines three desirable features: It is reasonably easy to build, it is very portable, and it provides back support.
My version differs from the picture in two major and several minor ways. The first major difference is that it is designed to be easily disassembled for transport. While the original was presumably glued, mine is held together by a rope, as shown in the figure. The second is that the back support on mine is substantially lower than in the figure. I built it that way because the support is on a vertical dowel, so if high forces me to sit with my back more nearly vertical than I like. Further experiments should test my conjecture that the lower support is more comfortable for me.
Materials for the chair
2 front legs, 2² hardwood dowels 18" 1 hardwood plank 8²x22²x1/4² (seat)
1 back leg, 2" hardwood dowel 28² 1 hardwood plank 3/4²x6²x2 (back)
3 lower horizontals, 3/4" hardwood dowels 16² 9' of rope + 1 random stick
3 upper horizontals, 7/8² hardwood dowels 16"
Total Cost: Approximately $50
Figure 3 shows side views of one of the front legs, the back leg, and the back support (which attaches to the back leg). Figure 4 is an end view showing the placement of the holes into which the horizontal dowels fit; it is the same for all three legs and, unlike the other figures, is full sized. To get the placement and angle of the holes right, make two copies of Figure 4. Cut the circles out and glue them to the top and bottom ends of each of the legs, making sure their orientation is the same; use a flour and water paste to make later removal easier. Then draw a line connecting point a on the top copy with point a on the bottom and another connecting b with b. The center points of the holes at A1 and A2 will be on line aa, the center points of the holes at B1 and B2 on line bb. To get the angle of the hole correct, orient the dowel so line aa' (or bb', depending which hole you are drilling) is vertical, than drill straight down. The upper two inches of the back leg have a flat surface on their front where the back support is attached. The support is slightly convex in the horizontal direction and rounded at the front top edge, as shown.
Figure 3 Figure 4
The seat fits into grooves in the upper horizontals, shown in Figure 5. The ends of the 7/8" dowels are reduced to 3/4" to fit the corresponding holes (A1 or B1) in the legs. The tip of the support is cut at an angle to fit flush against the corresponding end of the other support going into the same leg. The lower horizontals have similarly angled tips but no groove. Their diameter is a little less (3/4" instead of 7/8") since they don't have to be big enough to fit the seat into, so there is no need to reduce the ends to fit the holes (A2, B2).
 Figure
5
Figure
5
The seat is two pieces of 1/4" hardwood plank as shown in Figure 6. It's shape is an equilateral triangle with circular arcs cut out of the tips. Each side of the triangle is 16 1/2", the radius of the arcs is 1 1/4". The exact layout depends on the width of your plank; the figure assumes 7". It may require some trial and error to get the dimensions just right--big enough to fit all the way into the grooves but not to keep the horizontals from fitting all the way into the holes in the legs. Remember that removing wood is easier than adding it.
Figure 6
Once all the pieces have been cut out and the back support glued to the front of the upper end of the back leg, the chair is ready to be assembled. Fit all of the horizontal supports into the corresponding holes in the chair legs, being sure to orient the angled ends so they fit together. This should also put the slots in the upper horizontals where they need to be to hold the seat. When the whole thing is fitted together, tie the rope twice around the three legs between the two sets of supports as shown in Figure 2 and tighten it with a stick. If your joints are tight enough, you may find that the chair will hold together without the rope.
Tools: You will need a saw to cut pieces to length and to cut the flat surface at the upper end of the back leg, where the back rest glues on. To drill the holes use a drill press, a portable electric drill, or a brace and bit. All holes are 3/4" so that is the only size bit you need. You can put the groove in the upper horizontals with a bench saw or radial saw. It should be possible to do it with a hand saw and chisel, but a lot of work. If you want to try, I suggest marking two lines 1/4" apart for the edges of the groove and driving several small nails into the dowel along one of them to serve as guides for the saw.
A spokeshave and file can be used to reduce the ends of the upper horizontals enough to fit into the holes in the legs; if you don't have a spokeshave, use a plane or chisel. To shape the chair back I used a chisel to remove the superfluous wood then a belt sander to smooth it. Alternatively, you can start with a 1/4" thick piece, steam it and bend it. To do that, you get a pot with a lid, big enough to fit the wood piece in horizontally. Put in an inch or so of water and a bowl to rest the piece on. Bring the water to a boil, put the piece on the bowl above the water, cover it, steam for ten or fifteen minutes, then clamp the piece to a suitably curved surface until it dries. I have done only a little experimenting with this, so you may want to talk to someone with more experience steaming wood.
Variations: The dimensions are for a chair that fits me; you can experiment to get it right for you. For proportions closer to those of Figure 1, use a longer dowel for the back leg. If you never plan to disassemble the chair, use glue to hold it together instead of rope.
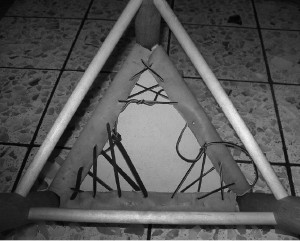
The picture below shows a variant on the chair which has the advantage of being substantially easier to make. The seat is leather instead of wood. That means you don't have to groove or taper the upper horizontals--just use 3/4" dowels like the lower horizontals. The seat is a piece of vegetable tanned leather, 8 ounce or heavier, that wraps around the upper horizontals; I laced the edges to each other as shown in the second picture, which shows the chair upside down.
One thing I did wrong in the chair shown was to cut the back support
with the grain running vertically--making a split in the short
dimension easy (discovered the hard way). It should run horizontally.